Jagged Printing from AppleWorks

2000.03.03 


http://www.barefeetware.com/appleworks/jagged/

Introduction


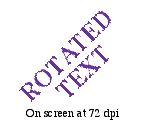
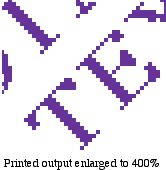
When printing from AppleWorks, some objects may print at 72 dpi (screen resolution) instead of the printer's resolution (usually 300 dpi or over). These objects stand out as having "jagged edges".


Problem
The most common problem occurs when text is rotated or flipped in a drawing document, such as when using BareFeetWare's Text Along Arc script. AppleWorks 5 has a bug that does not allow high resolution output of rotated text to QuickDraw printers.

QuickDraw printers are basically all those which do not support PostScript. QuickDraw printers include the Apple StyleWriter Series, HP's DeskJets, Epson's Stylus series, unless a PostScript card or software RIP is added. A QuickDraw printer requires the computer to raster (create) the print job at high resolution. The print driver basically creates a 360 dpi (or whatever) bitmap of the document output and sends each high resolution pixel to the printer. By contrast, a PostScript printer just receives the brief definition of the draw objects (eg text "Hello" rotated by 45%) and rasters within the printer's PostScript engine. Because PostScript understands rotated text, it prints at high resolution.

The window zoom controls at the bottom left of an AppleWorks window:

AppleWorks has enough information about the graphic to render it at high resolution on the computer for sending to the printer. This can be demonstrated by zooming the window to 400% (approximate printer resolution) and noting that the edges of the graphics are still smooth. The software is able to display the graphic on screen at the 72 dpi screen resolution even when zoomed in at 800% or more. So it should be able to print the graphic at high resolution too. Unfortunately, AppleWorks 5 (and AppleWorks 6 if Fractional Character Widths is disabled) does not render at high resolution before sending rotated text. Other draw objects and non rotated text are sent at high resolution.


Fix for AppleWorks 6
Thankfully, this old bug is fixed in AppleWorks 6. However, you must enable Fractional Character Widths in the General Preferences dialog. To do that:

    1. Ensure that your document is active (at the font).
    2. In the Edit Menu, select Preferences > General.


      In the Preferences dialog, enable the Fractional Character Widths option:


      Click the OK button. If you print a lot of rotated text, then you may wish to first click Make Default. However, Fractional Character Widths does slow down AppleWorks and produce some misalignment on screen, so be cautious.

This procedure does not fix the problem in AppleWorks/ ClarisWorks 5 or earlier.

After doing the above, rotated text should print OK on all printers. However, you may still have jagged edges in paintings and EPS clip art, in which case the work arounds below are still useful.

Work Around: Page setup 25%
The most effective and flexible work around to this low resolution printing problem is also the least known (at least until we published this page ;-). This work around is simple to implement for drawing documents. It requires:

    1. In the Page Setup (File menu) of your document, set the enlarge/reduce ratio to 25%:

      Set the zoom of the document window to 25%:

      Draw everything 4 times the size that you would normally.

Because the window zoom is set to 25%, the visual size will be the same as printed. But AppleWorks will treat them as 4 times larger in ruler measurements. For example, to draw text to print at 12 point, you will actually need to draw it at 48 point. On screen with 25% window zoom, it will visually be 12 point and printed at 25% it will be 12 point, but AppleWorks will internally be treating it as 48 point.

If the chosen printer for your document is changed (eg from Epson Stylus to Apple StyleWriter), then the page set up reduction will be lost, requiring a reset to 25%.

Paint frames can be drawn at the required visual size. When content is painted, it will actually be stored at 4 x the visual resolution so will not print jagged. You may wish to zoom in to 100% to apply fine detail.

At 25% zoom, it may be difficult to visually judge the precise alignment of objects. You may wish to zoom in to 100% for detailed work.

If you already have a document which you need to "fix" for high resolution, then simply set the window zoom and page setup to 25%. Then:

    1. Select all (Edit menu) the drawing objects.
    2. Group (Arrange menu) them.
    3. Scale by Percent (Arrange menu) to 400%
    4. Ungroup (Arrange menu) the objects.
    5. Check the alignment and joining of objects which may require fine adjustment at 100% zoom.
    6. Any text frames will need to have the font size adjusted by 400% (eg from 12 point to 48 point) since scaling does not scale font sizes.
    7. Any paint frames will need to be redrawn at high resolution or have the contents scaled (but that yields a jagged result).


Work Around: Paste into Paint Frame
The most commonly suggested work around for printing without jagged edges is to:
    1. Scale (Arrange menu) the graphic object (eg rotated text) to 400%.
    2. Copy (Edit menu) the object.
    3. Undo (Edit menu) the scaling so the graphic is the original size.
    4. Draw a paint frame.
    5. Set the resolution (Document menu) of the paint frame to 288 dpi (4 x 72 dpi).
    6. Enlarge the paint frame to be large enough for the pasted object. Use the original draw object as a guide.
    7. Paste into the paint frame.
    8. Set the paint frame's line to white or transparent, if required. Set the fill pattern to transparent if obscuring other objects.

This method is also discussed in Apple's Tech Info Library articles 56582 and 54787.

The disadvantage of this work around is that the pasted paint graphic is no longer editable as a draw object. To apply changes such as recoloring, change in rotation etc, requires redrawing from scratch and pasting into a paint frame again. Repasting is also required if the desired output resolution changes.


EPS Clip Art
EPS clip art files include a PostScript drawing and a bitmap (72 dpi paint) preview image. When the printer can't use the EPS (ie it is not PostScript) it uses the paint image instead. You need to interpret the EPS PostScript somehow. A PostScript printer will do it, of course. You may have some success with EPStoPICT - a utility which converts EPS files to PICT drawings so QuickDraw printers can print them and AppleWorks can even edit them.


Contact
Please don't hesitate to contact us if you have any questions.

© 1999 BareFeetWare